Cheesy Ham & Veggie Melts (The Ultimate Leftover Sandwich)
- Chef Jay Gourmet

- Jan 1
- 5 min read
After the holidays, many of us find ourselves staring at a refrigerator full of leftover ham and roasted vegetables, wondering how to transform these beautiful ingredients into something fresh and exciting. At The Hungry People Corporation, we believe that every piece of food deserves a second chance to nourish and delight: and that's exactly what our Cheesy Ham & Veggie Melts deliver.
This isn't just another leftover recipe. It's a celebration of resourcefulness, a testament to the magic that happens when we refuse to let good food go to waste, and proof that some of the most satisfying meals come from the simplest transformations.
Why This Recipe Matters
Food waste is one of our biggest challenges as a society. According to recent studies, the average American family throws away hundreds of dollars worth of food each year. But here's the thing: those "leftovers" aren't scraps waiting to be discarded. They're ingredients waiting for their moment to shine.
When we transform yesterday's holiday ham and those perfectly roasted vegetables into golden, melty sandwiches, we're doing more than just creating lunch. We're practicing the kind of mindful cooking that feeds both body and soul, stretching our food dollars further, and honoring the resources that went into creating our meals in the first place.

The Magic in the Method
What makes these melts truly special isn't just the combination of flavors: though the marriage of smoky ham, caramelized vegetables, and bubbling cheese is absolutely divine. It's the technique that brings it all together.
The secret lies in the balance between the crusty, golden exterior and the molten interior. When you bite into one of these sandwiches, you experience layers of texture and flavor that transform humble leftovers into something that feels both comforting and sophisticated.
Essential Ingredients for Success
For the Base:
4 slices of sturdy bread (sourdough, whole grain, or crusty artisan bread work beautifully)
6-8 ounces leftover ham, sliced or chunked
1-2 cups roasted vegetables (any combination works: think roasted Brussels sprouts, carrots, bell peppers, zucchini, or eggplant)
4-6 slices of cheese (sharp cheddar, Gouda, Havarti, or Swiss all melt beautifully)
For the Flavor Bridge:
3 tablespoons mayonnaise or Greek yogurt
1 tablespoon Dijon mustard
1 tablespoon fresh herbs (basil, thyme, or parsley)
1 teaspoon lemon juice
Salt and freshly ground black pepper to taste
Optional: a handful of fresh greens like arugula or watercress
The beauty of this recipe lies in its flexibility. Don't have exactly these ingredients? No problem. The technique works with whatever leftover protein and vegetables you have on hand.
Step-by-Step Assembly
Prepare Your Spread: In a small bowl, whisk together the mayonnaise (or Greek yogurt), Dijon mustard, fresh herbs, and lemon juice. Season with salt and pepper. This creamy, tangy spread acts as both moisture and flavor enhancer, preventing the sandwich from becoming dry while adding depth to every bite.
Build Your Foundation: Lay out your bread slices and generously spread the herb mixture on one side of each slice. This spread creates a flavorful barrier that prevents the bread from getting soggy while adding richness to the overall taste profile.
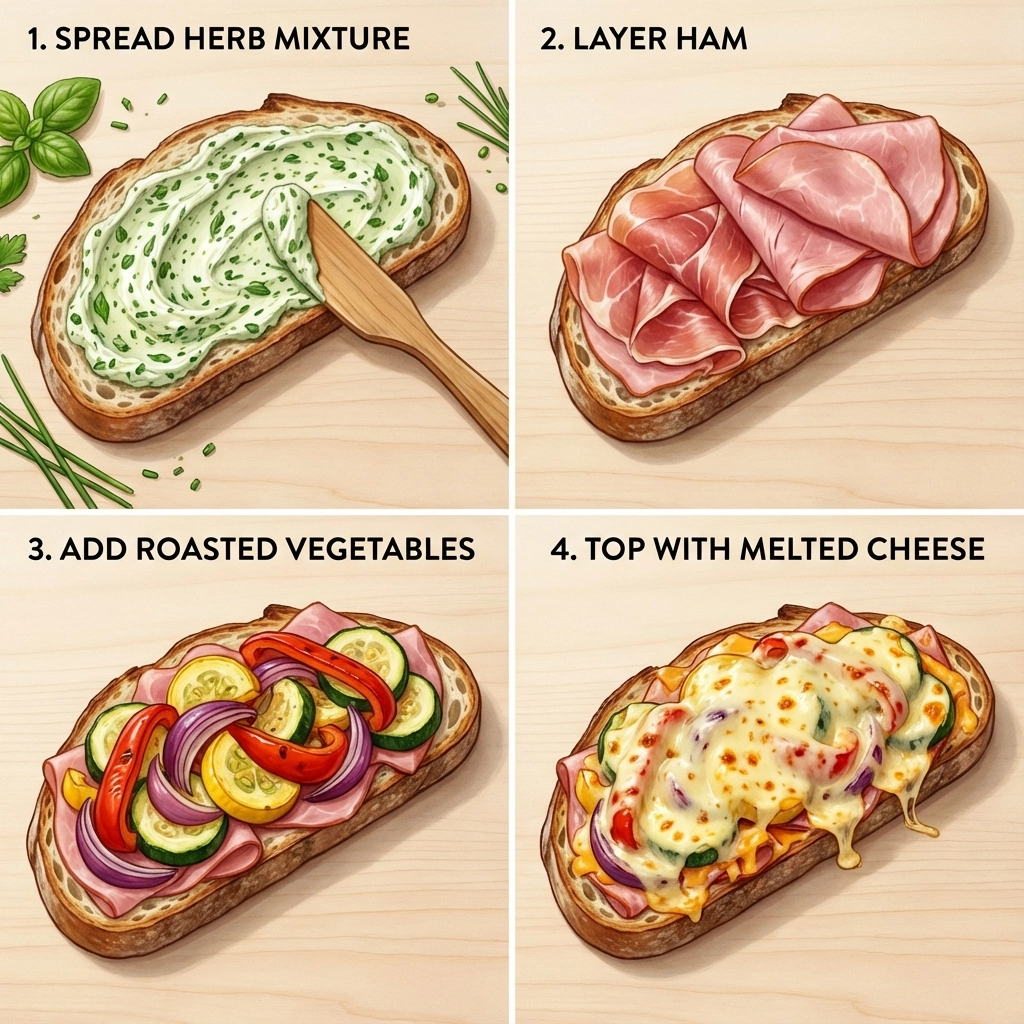
Layer with Purpose: On two of the prepared bread slices, layer your ingredients thoughtfully. Start with the ham: don't just pile it on, but distribute it evenly so every bite has protein. Next, add your roasted vegetables. If they're large pieces, consider chopping them roughly to ensure even distribution and easier eating.
Top with cheese slices, making sure to cover the filling completely. The cheese acts as both flavor component and "glue" that holds everything together when melted.
The Final Assembly: Top with the remaining bread slices, spread-side down. Gently press the sandwiches together: you want them cohesive but not compressed.
The Perfect Melt: Cooking Techniques
Oven Method (Our Favorite): Preheat your oven to 400°F. Place the assembled sandwiches on a baking sheet lined with parchment paper. Bake for 8-10 minutes, then carefully flip and bake for another 5-7 minutes until the bread is golden and the cheese is completely melted.
Stovetop Method: Heat a heavy skillet over medium-low heat. Cook the sandwiches for 3-4 minutes per side, pressing gently with a spatula. The key is patience: low and slow ensures the cheese melts completely before the bread burns.
Broiler Finish: For extra-crispy tops, finish assembled open-faced sandwiches under the broiler for 1-2 minutes, watching carefully to prevent burning.
Customization: Making It Your Own
The foundation recipe is just the beginning. Here are some inspired variations that showcase the versatility of this technique:
Mediterranean Style: Use roasted eggplant, zucchini, and red peppers with feta cheese and a spread made with Greek yogurt, lemon zest, and fresh oregano.
Harvest Season: Combine leftover ham with roasted butternut squash, caramelized onions, and sharp cheddar, with a spread enhanced with sage and a touch of apple cider vinegar.
Tex-Mex Twist: Transform leftover carnitas or ham with roasted bell peppers, onions, and pepper jack cheese, using a spread made with lime juice, cilantro, and a pinch of cumin.

Pro Tips for Melt Perfection
Temperature Control: Keep your heat moderate. High heat will burn the outside before the inside is properly melted and heated through.
Bread Selection: Choose bread with some heft: thin slices will get soggy, while too-thick slices won't heat through properly. Day-old bread actually works better than fresh, as it holds up better to moisture.
Cheese Strategy: Mix cheese types for complexity. A combination of sharp and mild cheeses creates depth of flavor while ensuring good melting properties.
Vegetable Prep: If your leftover vegetables seem a bit dry, drizzle them lightly with olive oil before assembly. If they're very wet, pat them dry to prevent soggy sandwiches.
Make-Ahead Option: Assemble sandwiches in the morning and refrigerate until ready to cook. This actually helps the flavors meld together beautifully.
Serving and Sharing
These melts are substantial enough to serve as a complete meal, especially when paired with a simple green salad or a cup of soup. They're perfect for lunch, dinner, or even a hearty breakfast.
Consider making extra: they reheat well in a toaster oven and make excellent packed lunches. Wrap them in foil while still warm to maintain the crispy exterior and melted interior.
The Bigger Picture
Every time we transform leftovers into something delicious and satisfying, we're participating in a larger conversation about food, resources, and creativity. At The Hungry People Corporation, we see this kind of resourceful cooking as part of our mission: it's about making the most of what we have, reducing waste, and proving that nutritious, satisfying meals don't require expensive or exotic ingredients.
When you make these Cheesy Ham & Veggie Melts, you're not just feeding your family: you're practicing the kind of mindful, resourceful cooking that honors both your ingredients and your budget. You're proving that leftovers aren't second-class citizens in the kitchen, but ingredients waiting for their moment to shine in a completely new way.
So the next time you open your refrigerator to find containers of holiday ham and roasted vegetables, don't see leftovers: see possibility. See the foundation for golden, crispy, melty sandwiches that will have your family asking when you're making them again.
After all, the best meals often come from the simplest transformations, and sometimes the most satisfying bite is the one that started as something else entirely.
Comments